Developer Guide
- Acknowledgements
- Setting up, getting started
- Design
- Implementation
- Documentation, logging, testing, configuration, dev-ops
- Appendix: Requirements
- Appendix: Instructions for manual testing
Acknowledgements
This project is based on the AddressBook Level-3 project created by the SE-EDU initiative.
Libraries used:
Setting up, getting started
Refer to the guide Setting up and getting started.
Design
.puml files used to create diagrams in this document can be found in the diagrams folder. Refer to the PlantUML Tutorial at se-edu/guides to learn how to create and edit diagrams.
Architecture

The Architecture Diagram given above explains the high-level design of the App.
Given below is a quick overview of main components and how they interact with each other.
Main components of the architecture
Main has two classes called Main and MainApp. It is responsible for,
- At app launch: Initializes the components in the correct sequence, and connects them up with each other.
- At shut down: Shuts down the components and invokes cleanup methods where necessary.
Commons represents a collection of classes used by multiple other components.
The rest of the App consists of four components.
-
UI: The UI of the App. -
Logic: The command executor. -
Model: Holds the data of the App in memory. -
Storage: Reads data from, and writes data to, the hard disk.
How the architecture components interact with each other
The Sequence Diagram below shows how the components interact with each other for the scenario where the user issues the command delete -p 1.

Each of the four main components (also shown in the diagram above),
- defines its API in an
interfacewith the same name as the Component. - implements its functionality using a concrete
{Component Name}Managerclass (which follows the corresponding APIinterfacementioned in the previous point.
For example, the Logic component defines its API in the Logic.java interface and implements its functionality using the LogicManager.java class which follows the Logic interface. Other components interact with a given component through its interface rather than the concrete class (reason: to prevent outside component’s being coupled to the implementation of a component), as illustrated in the (partial) class diagram below.

The sections below give more details of each component.
UI component
The API of this component is specified in Ui.java

The UI consists of a MainWindow that is made up of parts e.g.CommandBox, ResultDisplay, PersonListPanel, InternshipListPanel, StatusBarFooter etc. All these, including the MainWindow, inherit from the abstract UiPart class which captures the commonalities between classes that represent parts of the visible GUI.
The UI component uses the JavaFx UI framework. The layout of these UI parts are defined in matching .fxml files that are in the src/main/resources/view folder. For example, the layout of the MainWindow is specified in MainWindow.fxml
The UI component,
- executes user commands using the
Logiccomponent. - listens for changes to
Modeldata so that the UI can be updated with the modified data. - keeps a reference to the
Logiccomponent, because theUIrelies on theLogicto execute commands. - depends on some classes in the
Modelcomponent, as it displaysPersonobject residing in theModel.
Logic component
The API of this component is specified in Logic.java
Here’s a (partial) class diagram of the Logic component:

How the Logic component works:
- When
Logicis called upon to execute a command, it uses theAddressBookParserclass to parse the user command. - This results in a
Commandobject (more precisely, an object of one of its subclasses e.g.,DeletePersonCommand) which is executed by theLogicManager. - The command can communicate with the
Modelwhen it is executed (e.g. to delete a person). - The result of the command execution is encapsulated as a
CommandResultobject which is returned back fromLogic.
The Sequence Diagram below illustrates the interactions within the Logic component for the execute("delete -p 1") API call.

DeleteCommandParser should end at the destroy marker (X) but due to a limitation of PlantUML, the lifeline reaches the end of diagram.
Here are the other classes in Logic (omitted from the class diagram above) that are used for parsing a user command:

How the parsing works:
- When called upon to parse a user command, the
AddressBookParserclass creates anXYZCommandParser(XYZis a placeholder for the specific command name e.g.,AddPersonCommandParser) which uses the other classes shown above to parse the user command and create aXYZCommandobject (e.g.,AddPersonCommand) which theAddressBookParserreturns back as aCommandobject. - All
XYZCommandParserclasses (e.g.,AddPersonCommandParser,DeletePersonCommandParser, …) inherit from theParserinterface so that they can be treated similarly where possible e.g, during testing.
Model component
The API of this component is specified in Model.java

The Model component,
- stores the address book data i.e., all
Personobjects (which are contained in aUniquePersonListobject). - stores the currently ‘selected’
Personobjects (e.g., results of a search query) as a separate filtered list which is exposed to outsiders as an unmodifiableObservableList<Person>that can be ‘observed’ e.g. the UI can be bound to this list so that the UI automatically updates when the data in the list change. - stores a
UserPrefobject that represents the user’s preferences. This is exposed to the outside as aReadOnlyUserPrefobjects. - does not depend on any of the other three components (as the
Modelrepresents data entities of the domain, they should make sense on their own without depending on other components)
Tag list in the AddressBook, which Person references. This allows AddressBook to only require one Tag object per unique tag, instead of each Person needing their own Tag objects.
Storage component
The API of this component is specified in Storage.java

The Storage component,
- can save both address book data and user preference data in json format, and read them back into corresponding objects.
- inherits from both
AddressBookStorageandUserPrefStorage, which means it can be treated as either one (if only the functionality of only one is needed). - depends on some classes in the
Modelcomponent (because theStoragecomponent’s job is to save/retrieve objects that belong to theModel)
Common classes
Classes used by multiple components are in the seedu.addressbook.commons package.
Implementation
This section describes some noteworthy details on how certain features are implemented.
Edit Internship
Implementation
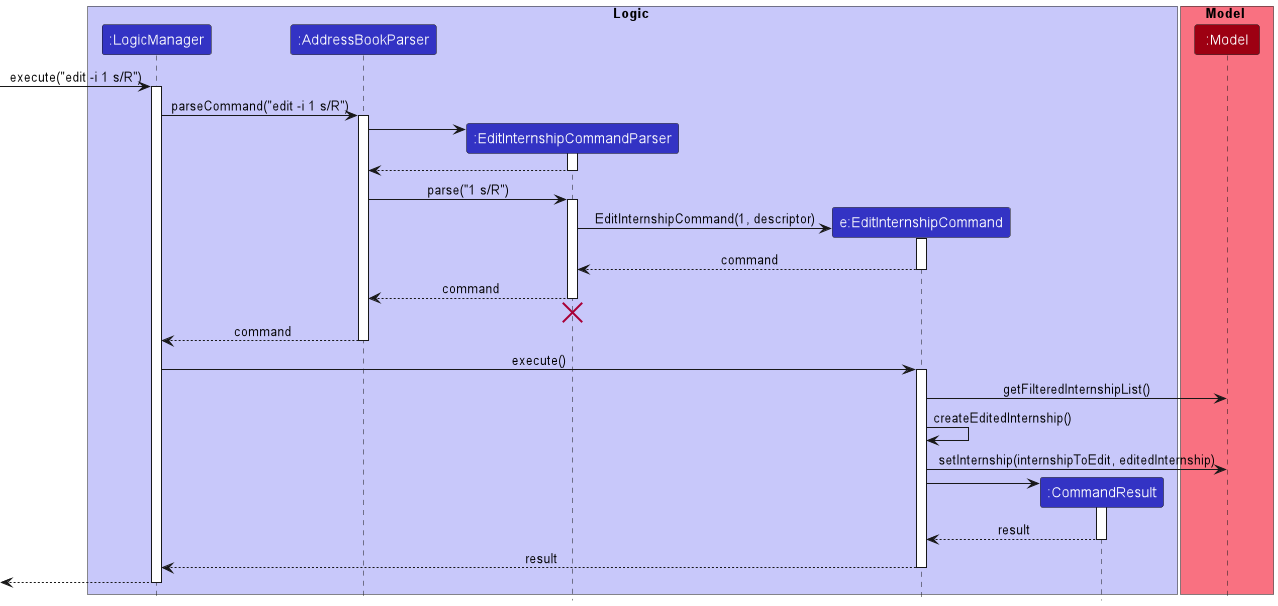
Given below is an example usage scenario.
- InterNUS shows a list of internships. The user edits the first internship in the list using the command
edit -i 1 s/R. - The command is accepted by the
Logiccomponent, which passes it to theAddressBookParser. - The
AddressBookParsercreates the corresponding parser,EditInternshipCommandParserto parse the arguments1 s/R. - The parser stores the details to edit in an
EditInternshipDescriptor. The parser also creates anEditInternshipCommandwith the index1and the descriptor as arguments. - The
EditInternshipCommandis returned to theLogicManager, which then calls itsexecute()method. - To retrieve the list of internships,
Model#getFilteredInternshipList()is called. The target internship (the one at index1) is retrieved from theFilteredList. An updatedInternshipis also created via a self invocation:createEditedInternship(). -
Model#setInternship()is called to replace the target internship with the updated internship. -
Model#updateFilteredInternshipList()is called to update the internship list to display all internships. - Finally,
EditInternshipCommandcreates aCommandResultto denote that the operation is completed, and returns thisCommandResultback toLogicManager.
The sequence diagram is given below (some details are omitted, such as the instantiation of the EditInternshipDescriptor).
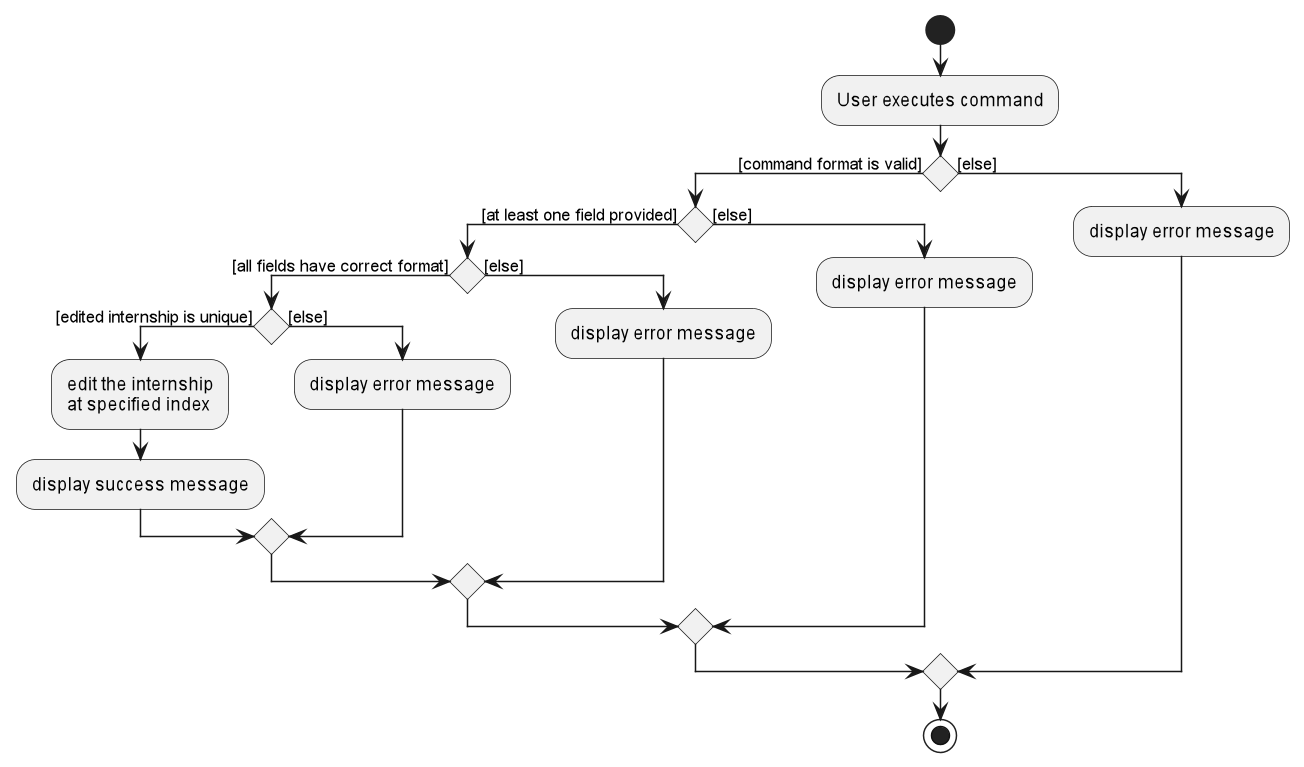
The following activity diagram summarizes what happens when a user executes an EditInternshipCommand:
Sort Person list
Implementation
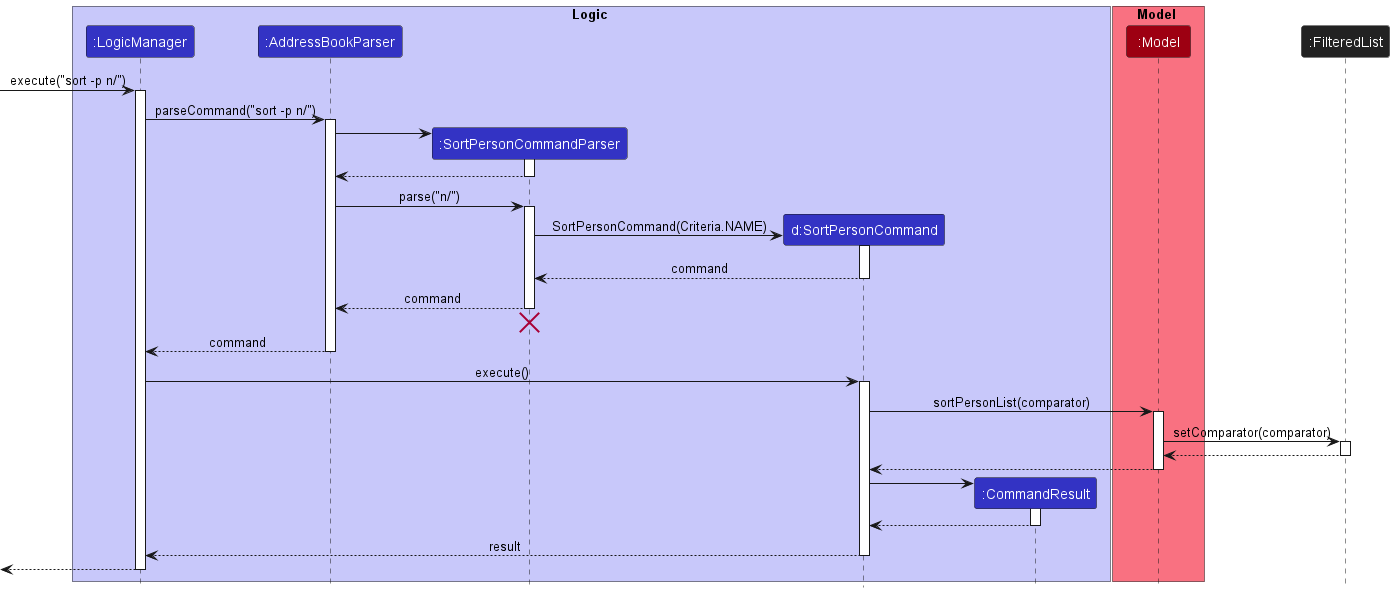
- When the user sorts the person list, the command goes through the
LogicManager, which will then go through theAddressBookParser. - The
AddressBookParserwill then create the corresponding parser for the command, which isSortPersonCommandParser. - After which, it will pass the argument (the full command excluding the command word and flag) to this parser.
- The command parser will then create a
SortPersonCommandwith the corresponding internal variable (n/means sort by name,c/means sort by associated company name). This is facilitated by theCriteriaenumeration. - The method then returns all the way back to
LogicManager, which is then stored as a variable calledcommand. - Then, the command is executed by calling the
execute()method ofSortPersonCommand(the command that was returned earlier) directly. - Based on its internal variable, it will call
sortPersonlist()in theModelclass on the person list, and passes the sort criterion. - The person list will then set the comparator based on the criterion that was passed earlier, and the list is sorted based on that comparator.
- Afterwards,
SortPersonCommandcreates aCommandResultto denote that the operation is completed, and returns thisCommandResultback toLogicManager.
The sequence diagram is given below.
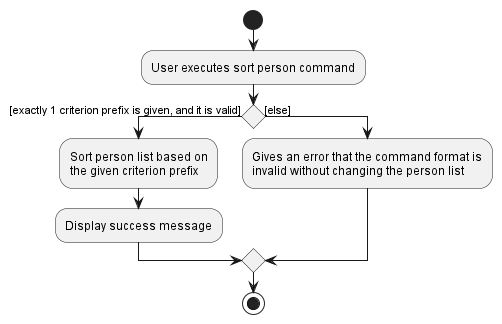
The following activity diagram summarizes what happens when a user attempts to sort the person list:
Design considerations
The sorting mechanism is designed in a way to keep all operations to the SortPersonCommand object itself,
which will them prompt the Model to set the comparator of the person list.
This is consistent with the other commands, as they will go through the same process, since each command has their own class and parser (if needed).
Find Person
Implementation
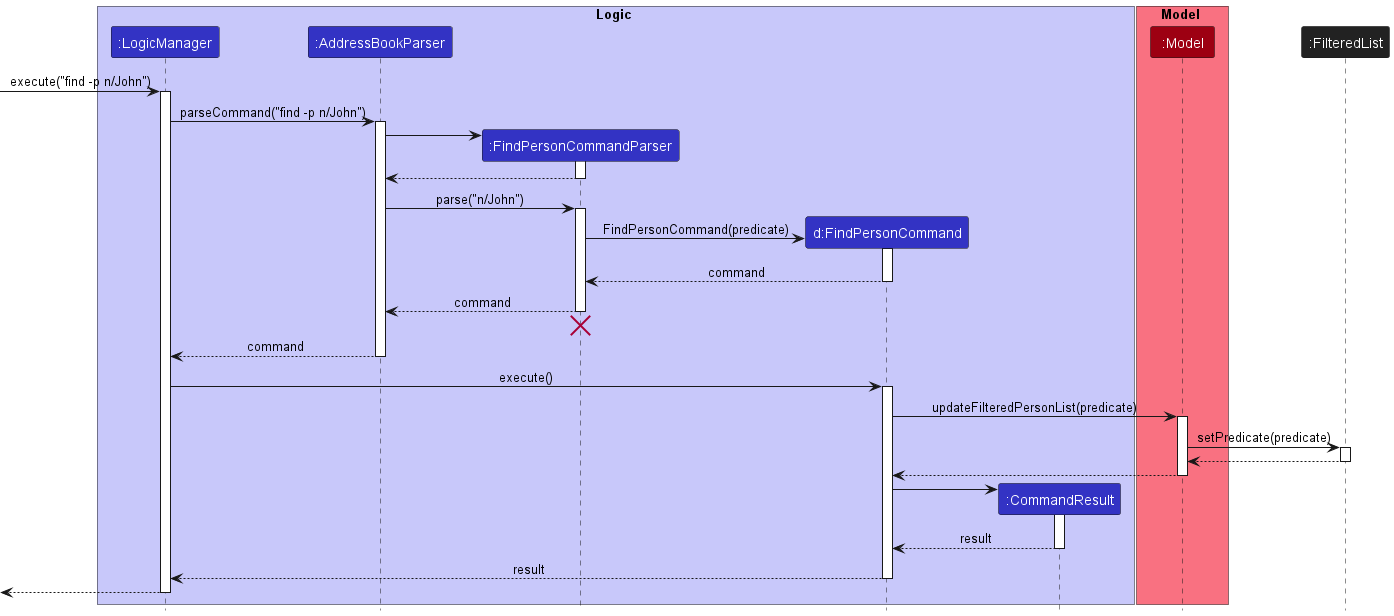
- When the user attempts to find a person or internship, the command goes through the
LogicManager, which will then go through theAddressBookParser. - The
AddressBookParserwill then create the corresponding parser for the command,FindPersonCommandParser. - After which, it will pass the argument (the full command excluding the command word and flag) to this parser.
- The command parser will then create a
FindPersonCommandby constructing and storing apredicatethat checks, for each field of thePerson, whether it contains any of the specified keywords. The determining of which keyword is for which field is done via parsing of prefixes in the command, and these prefixes are consistent with the ones used in other commands such as theAddcommand. - The method returns a
Commandto theLogicManagerwhich is stored as a variable calledcommand. - This
commandis executed by calling itsexecute()method. - This will invoke the
updateFilteredPersonListmethod of themodelwith thepredicatethat was constructed earlier. - The
predicatewill then be passed to thefilteredPersonListof themodeland used to filter the list viasetPredicate. - Afterwards,
FindPersonCommandcreates aCommandResultto denote that the operation is completed, and returns thisCommandResultback toLogicManager.
The sequence diagram is given below.
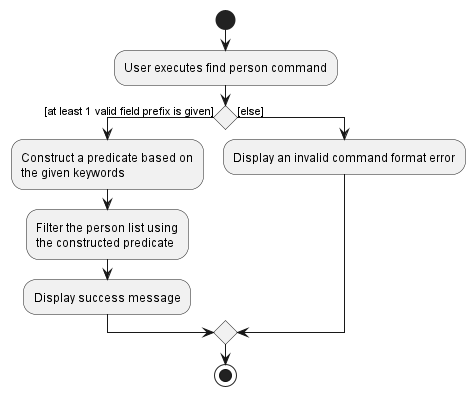
The following activity diagram summarizes what happens when a user attempts to find a person:
Design considerations
The finding mechanism is designed in a way to keep all operations to the FindPersonCommand object itself,
which will them prompt the Model to set the predicate of the person list.
This is consistent with the other commands, as they will go through the same process, since each command has their own class and parser (if needed).
Link Person and Internship
Implementation
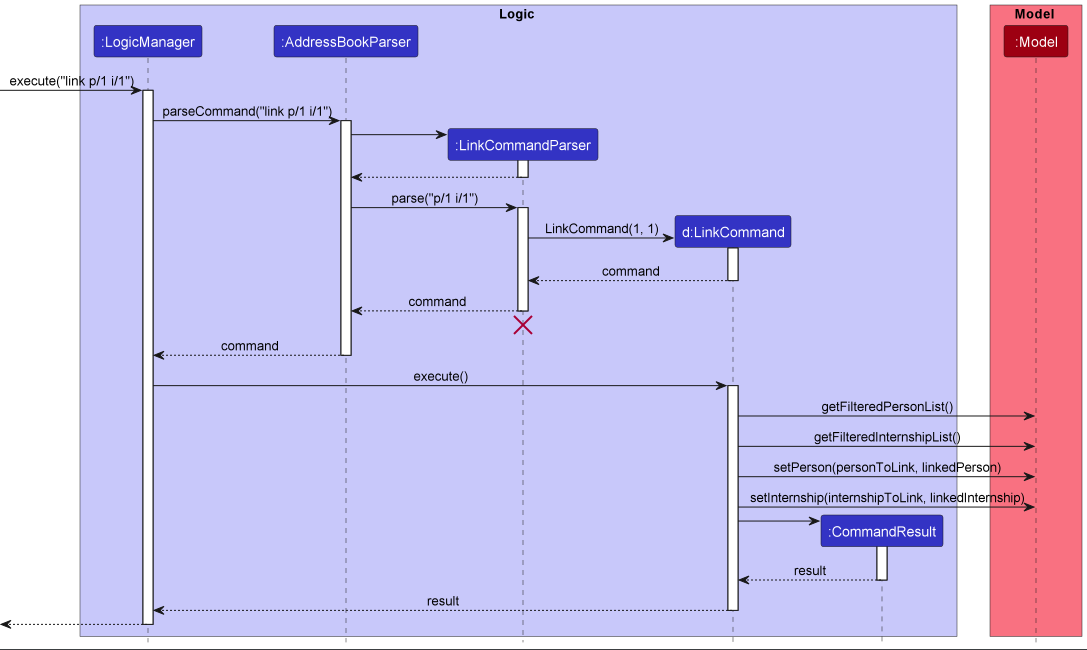
- When the user attempts to link a person amd an internship, the command goes through the
LogicManager, which will then go through theAddressBookParser. - The
AddressBookParserwill then create the corresponding parser for the command,LinkCommandParser. - After which, it will pass the argument (the full command excluding the command word and flag) to this parser.
- The command parser will then create a
LinkCommandwith the specified person index and internship index. - The method then returns all the way back to
LogicManager, which is then stored as a variable calledcommand. - This
commandis executed by calling itsexecute()method. - This will invoke the
getFilteredPersonListandgetFilteredInternshipListmethods of themodel - Based on this
commandspecified person index and internship index, the respective person and internship will be fetched from the internal person list and internship list in InterNUS. NewPersonandInternshipobjects will be created with the fieldsinternshipIdandcontactPersonIdupdated respectively. -
setPersonandsetInternshipmethods of themodelwill be invoked to update the person and internship in InterNUS. - Afterwards,
LinkCommandcreates aCommandResultto denote that the operation is completed, and returns thisCommandResultback toLogicManager.
The sequence diagram is given below.
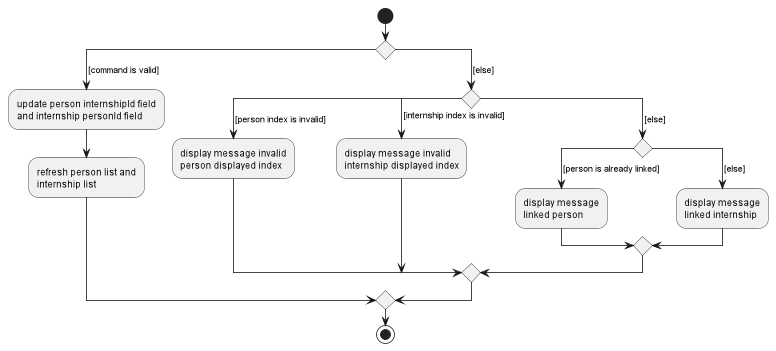
The following activity diagram summarizes what happens when a user attempts to link a person and an internship:
Documentation, logging, testing, configuration, dev-ops
Appendix: Requirements
Product scope
Target user profile:
- Can type fast
- Have some experience with Command Line Interfaces
- Are actively seeking internship opportunities
- Having trouble keeping track of multiple internship applications and their progress (over multiple rounds)
Value proposition:
- Keep track of multiple company contacts and applications’ progress simultaneously (the reply rates from companies are very low)
- Keep track of colleagues’ information post-internship
- Keep track of internship applications of multiple companies
- Keep track of contact information of hiring managers, and link them to internship openings
User stories
Priorities: High (must have) - * * *, Medium (nice to have) - * *, Low (unlikely to have) - *
| Priority | As a … | I can … | So that |
|---|---|---|---|
| * * * | First time user | See a summary of commands | I can know the functionalities of the app quickly |
| * * * | First time user | Delete internship status | I know that I have finished my interview process with the company |
| * * | First time user | View the user guide | I can know all the functions |
| * * | First time user | See the app populated with sample contacts when launching the app for the first time | I can easily see how the app will look like when it is in use |
| * * | First time user | See a help message when I use a command word incorrectly | I can easily learn how to use individual commands without the need to keep referring to the user guide |
| * * * | Second time user | Pre-load my data from the previous session | I do not need to re-add everyone again |
| * * * | Second time user | Purge all current data | I can get rid of sample contacts I used for exploring the app |
| * * | Second time user | See a summary of the internship information I have keyed in so far on starting the app | I can know where I left off from the last time I used the app |
| * * * | Lazy user | Find contacts by name | I do not need to manually filter them |
| * * * | Lazy user | Find internships by company and role | I do not need to manually filter them |
| * * * | User | Edit contacts and internships individually | I do not need to delete and re-add to fix a typo error |
| * * * | User | Delete contacts and internships individually | I can remove contacts and internships that I no longer need |
| * * * | User | Add the company name to each contact | I know which company the contact is representing |
| * * * | User | Add internship status to each internship | I know whether I have been accepted, rejected or still awaiting reply |
| * * * | User | Sort internships by internship status | I can know which company interview I can prepare for |
| * * * | Forgetful user | Sort internships by upcoming interview dates | I can see a clear timeline and prevent clashing dates |
| * * | User | Add roles to each internship | I know which role I am applying for (front-end, back-end etc) |
| * * | User | Add a company to each internship | I know which company I am apply for (Google, Shopee etc) |
| * * * | User | Link a contact to an internship as its contact person | I know who to contact for potential updates if I need to |
| * * * | User | Unlink a contact and an internship | I can remove the contact person for an internship once I no longer need it |
| * * | Expert user | Mass import contacts directly | I can use the app on another device |
| * | User | Personalize GUI colors and color themes (light mode, dark mode etc.) | I can make the app more visually appealing |
Use cases
(For all use cases below, the System is InterNUS and the Actor is the User, unless specified otherwise)
Use case: UC1 - Add a person to InterNUS
MSS
- User requests to add a person to InterNUS.
-
InterNUS adds the new person.
Use case ends.
Extensions
- 1a. The person is missing compulsory details.
- 1a1. InterNUS notifies the User about the missing details.
-
1a2. User specifies the details of the person to add.
Steps 1a1-1a2 are repeated until the required details are entered.
Use case resumes at step 2.
- 1b. The person’s details are of the incorrect format.
- 1b1. InterNUS notifies the User about the correct format required.
-
1b2. User corrects the details of the person.
Steps 1b1-1b2 are repeated until the details entered are of the correct format.
Use case resumes at step 2.
- 1c. The person is a duplicate.
-
1c1. InterNUS notifies the User that the person already exists.
Use case ends.
-
Use case: UC2 - Add an internship to InterNUS
MSS
- User requests to add an internship to InterNUS.
-
InterNUS adds the new internship.
Use case ends.
Extensions
- 1a. The internship is missing compulsory details.
- 1a1. InterNUS notifies the User about the missing details.
-
1a2. User specifies the details of the internship to add.
Steps 1a1-1a2 are repeated until the required details are entered.
Use case resumes at step 2.
- 1b. The internship’s details are of the incorrect format.
- 1b1. InterNUS notifies the User about the correct format required.
-
1b2. User corrects the details of the internship.
Steps 1b1-1b2 are repeated until the details entered are of the correct format. Use case resumes at step 2.
- 1c. The internship is a duplicate.
-
1c1. InterNUS notifies the User that the internship already exists.
Use case ends.
-
Use case: UC3 - Delete a person
MSS
- User requests to list persons.
- InterNUS shows a list of persons.
- User requests to delete a specific person in the list.
-
InterNUS deletes the person.
Use case ends.
Extensions
-
2a. The list is empty.
Use case ends.
-
3a. The given index is invalid.
-
3a1. InterNUS shows an error message.
Use case resumes at step 3.
-
-
3b. The person found at the index is a contact person for an internship.
-
3b1. InterNUS looks up the affected internship.
-
3b2. InterNUS removes the internship’s link to that person.
Use case resumes at step 4.
-
Use case: UC4 - Delete an internship
MSS
- User requests to list internships.
- InterNUS shows a list of internships.
- User requests to delete a specific internship in the list.
-
InterNUS deletes the internship.
Use case ends.
Extensions
-
2a. The list is empty.
Use case ends.
-
3a. The given index is invalid.
-
3a1. InterNUS shows an error message.
Use case resumes at step 3.
-
-
3b. The internship found at the index is associated with a person.
-
3b1. InterNUS looks up the affected person.
-
3b2. InterNUS removes the person’s link to the internship.
Use case resumes at step 4.
-
Use case: UC5 - Link a contact person to an internship
MSS
- User adds an internship to InterNUS (UC2).
- User adds a person to InterNUS (UC1).
- User requests to set the added person as the contact person for the added internship.
-
InterNUS sets the person as the contact person for the internship.
Use case ends.
Extensions
-
3a. The internship already has a contact person linked to it.
Use case ends. -
3b. The person is already the contact person of another internship.
Use case ends.
Use case: UC6 - Add an interview date for an internship
MSS
- User adds an internship to the internship list (UC2).
- User requests to set the interview date of a specific internship.
-
InterNUS sets the interview date for the internship.
Use case ends.
Extensions
-
2a. The interview date given is invalid.
- 2a1. InterNUS notifies the user why the given date is invalid.
-
2a2. User corrects the invalid interview date.
Steps 2a1-2a2 are repeated until the date given is of the correct format.
Use case resumes at step 3.
Use case: UC7 - Sort person list
MSS
- User requests to sort person list and supplies a criterion prefix.
-
InterNUS sorts person list based on the specified criterion prefix.
Use case ends.
Extensions
-
1a. User submits a blank or invalid criterion prefix.
- 1a1. InterNUS notifies the user that the criterion prefix is invalid and only 1 criterion prefix can be specified.
-
1a2. User enters a criterion prefix.
Steps 1a1-1a2 are repeated until the criterion prefix entered is valid.
Use case resumes at step 2.
-
1b. User submits more than 1 criterion prefixes.
- 1b1. InterNUS notifies the user that the criterion prefix is invalid and only 1 criterion prefix can be specified.
-
1b2. User enters 1 criterion prefix.
Steps 1b1-1b2 are repeated until 1 valid criterion prefix is entered .
Use case resumes at step 2.
Non-Functional Requirements
- Should work on any mainstream OS as long as it has Java
11or above installed. - Should be able to hold up to 1000 persons and 1000 internships without a noticeable sluggishness in performance for typical usage.
- A user with above average typing speed for regular English text (i.e. not code, not system admin commands) should be able to accomplish most of the tasks faster using commands than using the mouse.
- A user will not be able to communicate with the people in the contact.
- A user will not be able to share contacts with others.
- Should work only for single user.
- The data should be stored in a human editable text file.
- The GUI should work well for standard screen resolutions 1920x1080 and higher and for screen scales 100% and 125%.
- The GUI should be usable for resolutions 1280x720 and higher and for screen scales 150%.
- Each contact person can only link to one internship and each internship is only linked to one contact person.
Glossary
- Mainstream OS: Windows, Linux, Unix, OS-X
Appendix: Instructions for manual testing
Given below are instructions to test the app manually.
Launch and shutdown
-
Initial launch
-
Download the jar file and copy into an empty folder
-
Double-click the jar file Expected: Shows the GUI with a set of sample contacts. The window size may not be optimum.
-
-
Saving window preferences
-
Resize the window to an optimum size. Move the window to a different location. Close the window.
-
Re-launch the app by double-clicking the jar file.
Expected: The most recent window size and location is retained.
-
Editing a person
-
Editing a person in a filtered list of persons.
-
Prerequisites: Find the person of interest using the
find -p [PREFIX/KEYWORD]command. Assume a list of at least 1 person is shown. -
Test case:
edit -p 1 e/johndoe@gmail.com
Expected: First person in the list has his/her email updated. Details of the edited person shown in the status message. -
Test case:
edit -p 0 p/98981234
Expected: No person is edited. Error details shown in the status message. -
Other incorrect edit commands to try:
edit -p 1,edit -p x t/colleague(where x is larger than the list size).
Expected: Similar to previous.
-
Deleting a person
-
Deleting a person while all persons are being shown
-
Prerequisites: List all persons using the
list -pcommand. Multiple persons in the list. -
Test case:
delete -p 1
Expected: First contact is deleted from the list. Details of the deleted contact shown in the status message. -
Test case:
delete -p 0
Expected: No person is deleted. Error details shown in the status message. Status bar remains the same. -
Other incorrect delete commands to try:
delete -p,delete -p x,...(where x is larger than the list size).
Expected: Similar to previous.
-
Sorting person list
-
Sorts person list while all persons are being shown
-
Prerequisites: List all persons using the
list -pcommand. Multiple persons in the list. -
Test case:
sort -p n/
Expected: Person list is sorted by the persons’ names. -
Test case:
sort -p c/
Expected: Person list is sorted by the company’s names that each person is working at. Persons without an attached company name are listed at the bottom of the list. -
Test case:
sort -p n/ c/
Expected: Error is thrown to show that only 1 criterion prefix can be used, and it should be recognisable. -
Other incorrect sort person commands to try:
sort -p rbivrv,sort -p,sort -p n/ krvnkr,....
Expected: Similar to previous.
-
-
Sorts person list while not all persons are being shown
-
Prerequisites: Filter the persons list with
find -pcommand. Multiple persons in the list. -
Test case:
sort -p n/
Expected: Person list is sorted by the remaining persons’ names. -
Test case:
sort -p c/
Expected: Person list is sorted by the company’s names that each remaining person is working at. Remaining persons without an attached company name are listed at the bottom of the list. -
Test case:
sort -p n/ c/
Expected: Error is thrown to show that only 1 criterion prefix can be used, and it should be recognisable. -
Other incorrect sort person commands to try:
sort -p rbivrv,sort -p,sort -p n/ krvnkr,....
Expected: Similar to previous.
-
Finding a person
-
Finds a person by each given field.
-
Prerequisites: List is not empty.
-
Test case:
find -p n/alex
Expected: Finds all persons whose name contains the string “alex”. -
Test case:
find -p c/google
Expected: Finds all persons whose company contains the string “google”. -
Test case:
find -p
Expected: Error is thrown to show that at least 1 valid field prefix should be used. -
Other incorrect find person commands to try:
find -p asdf,find -p,....
Expected: Similar to previous.
-
Saving data
-
Dealing with missing/corrupted data files
-
Prerequisites: Go to the folder
dataand find the fileaddressbook.json. App is not launched. -
Test case: Delete the
datafolder
Expected: On app launch, InterNUS is populated with sample data. -
Test case: Delete the
addressbook.jsonfile
Expected: On app launch, InterNUS is populated with sample data. -
Test case: Delete the second line of
addressbook.json, which should be"persons" : [ {
Expected: On app launch, InterNUS will have no persons or internships data (i.e. empty lists).
-